Because traditional Chinese medicine (TCM) views the human body as an interconnected network of energy (qi) and seeks to restore balance and harmony, ensuring the smooth flow of qi and blood is crucial to nourish and regulate the reproductive system. TCM treatment aims to regulate menstruation, reduce anovulatory menstruation, help ovulation, improve egg quality, stabilize progesterone, and provide a good endometrium environment for successful implantation and pregnancy.
The Magic Auricular Pain Treatment Protocol
I have written in previous articles about the power of treating holographic micro-systems, such as the ear, hand or facial regions.1 Each of these contains a map of the rest of the body. There is two-way communication between micro-system points and their corresponding body parts. Stress and dysfunction in the liver, for example, can show up on the face through deep vertical lines on the brow (liver area) or through discolorations in the Liver point of the ears.
My previous article describes the auricular micro-macro technique I developed for rapid pain relief treatments, using microcurrent or microlight therapies. This method involves creating a polarized circuit between a painful or dysfunctional body point (using + polarity) and the ear point corresponding to that body area (using - polarity). For example, for stomach pain, the + probe could be placed in the center of the painful area of the abdomen, and the - probe touched to the Stomach point of the ear. The addition of color light to the treatment can create additional positive resonance with the organ or meridian, a factor that usually amplifies results.
This current article describes several additional steps for the micro-macro method that can augment and prolong results. I have found that multi-step protocols for pain relief and organ balancing are usually far more effective than administering single techniques. The following steps require the use of a microcurrent or microlight deivce with fixed polarity probe outputs available. A small auricular treatment tip will also need to be used with the probe treating the points.
The principles of treatment described here can also be applied through needle acupuncture or magnet therapies, although I have found the best results using microcurrent therapy. Electronics can produce three vital treatment benefits that needles cannot do well: polarization of a set of treatment points, ability to set specific resonant frequencies, and the addition of color light input into the points. Each of these factors has the potential to amplify results, and in many cases reduce treatment times for positive results. (However, with all these electronic benefits, there are still some conditions that respond better to needles, or a combination of needles and microcurrent.)
To perform the techniques described below, set your device to the following parameters:
- Current Intensity: 25-50 uA (lower level if 50 uA stings the ear)
- Frequency: 10 or 2.5 Hz (or you can set custom frequencies)
- Polarity: Use polarized output so that ear probe is - and body probe is +
- Timer: Set for 12 seconds per button push
- Modulation (if available): 2:1 ratio
- Color Light: If available, use blue or purple for pain, or other colors as needed for organic dysfunction.2
- Assemble small auricular probe tip to the - polarity probe for treating ear points. Keep this tip moist by dipping in water and then shaking off excess before treating each point.

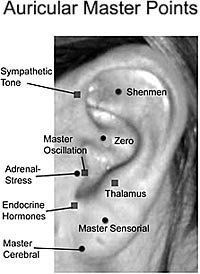
Step One: Place counter probe (+) on the most painful spot. For example, for pain in the shoulder, place the cotton-tipped counterprobe on the most painful shoulder point. You may ask the patient to hold the counterprobe to free up both of your hands for treating the ear points. Use the trigger probe to treat two to three Master points in the ear on the same side of the body as the pain, choosing from Shenmen, Zero, Thalamus, Sympathetic or Endocrine (see Figure 1). Treat each Master point for 12 to 30 seconds. If the pain is midline or bilateral, you may treat both ears or just choose the dominant side of the body. It is also recommended to treat the Zero point in both ears. For organic problems, you can place the + probe on the Mu-Alarm points on the body and the - probe on the corresponding organ point in the ear.
Step Two: In the same ear used in Step One, treat the ear point that anatomically corresponds to the painful part. For example, for shoulder pain, treat the Shoulder ear point on the same side. Use the searching function of the probe to locate the exact point. Treat for 12 - 20 seconds while the patient is mobilizing the affected body part (if possible).
Step Three: In the same ear, treat one related point, either a meridian or dermatome point.
Meridian Point (for deep pain): Determine which principal meridian runs through the painful body area and treat the ear point named after it. If the pain is clearly along the Large Intestine meridian of the shoulder, for example, treat the Large Intestine point of the ear. You can also choose these points based on underlying energetic imbalances, if you understand what those are.

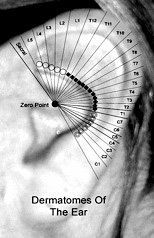
Dermatome Point (for radiating or neuropathic pain): Draw imaginary lines from the Zero point of the ear (in the center of the ear, on the helix root), through the spinal segments on the anthelix that correspond to the nerve root(s) of the dermatomes where the pain is. In the band from the Zero point, through the spinal root out to the edge of the ear, search for "hot" spots through palpation with a small stylus and treat. The auricular probe tip used with microcurrent devices acts as a good searching stylus for ear points.
This is an especially valuable treatment for shingles, post-herpetic neuralgia, neuropathy or other neurogenic pain conditions. If a patient presents with shingles pain on the T2-T10 rib areas, those will correspond to the black points on the anthelix shown on Figure 2. Imagine lines radiating from the Zero point out through the borders of this area of the anthelix, projecting out to the edge of the ear helix. The deliniated triangular "pie slice" is the area to search through palpation for the hot spots. Once located, treat them as indicated above. Violet light is indicated for neurogenic pain in many cases.
If the pain is not satisfactorily relieved, you can try changing the trigger-probe polarity to + for a more cooling effect in steps Two and Three. The - polarity will work in most other cases, however. Following the above procedures will make the pain "magically" melt away in most cases.
References
- acupuncturetoday.com/mpacms/at/article.php?id=31683
- A list of color light corresponding to organs: acupuncturetoday.com/mpacms/at/article.php?id=31415


